Make-It Monday - Merry Moose

20200831_144436.jpg

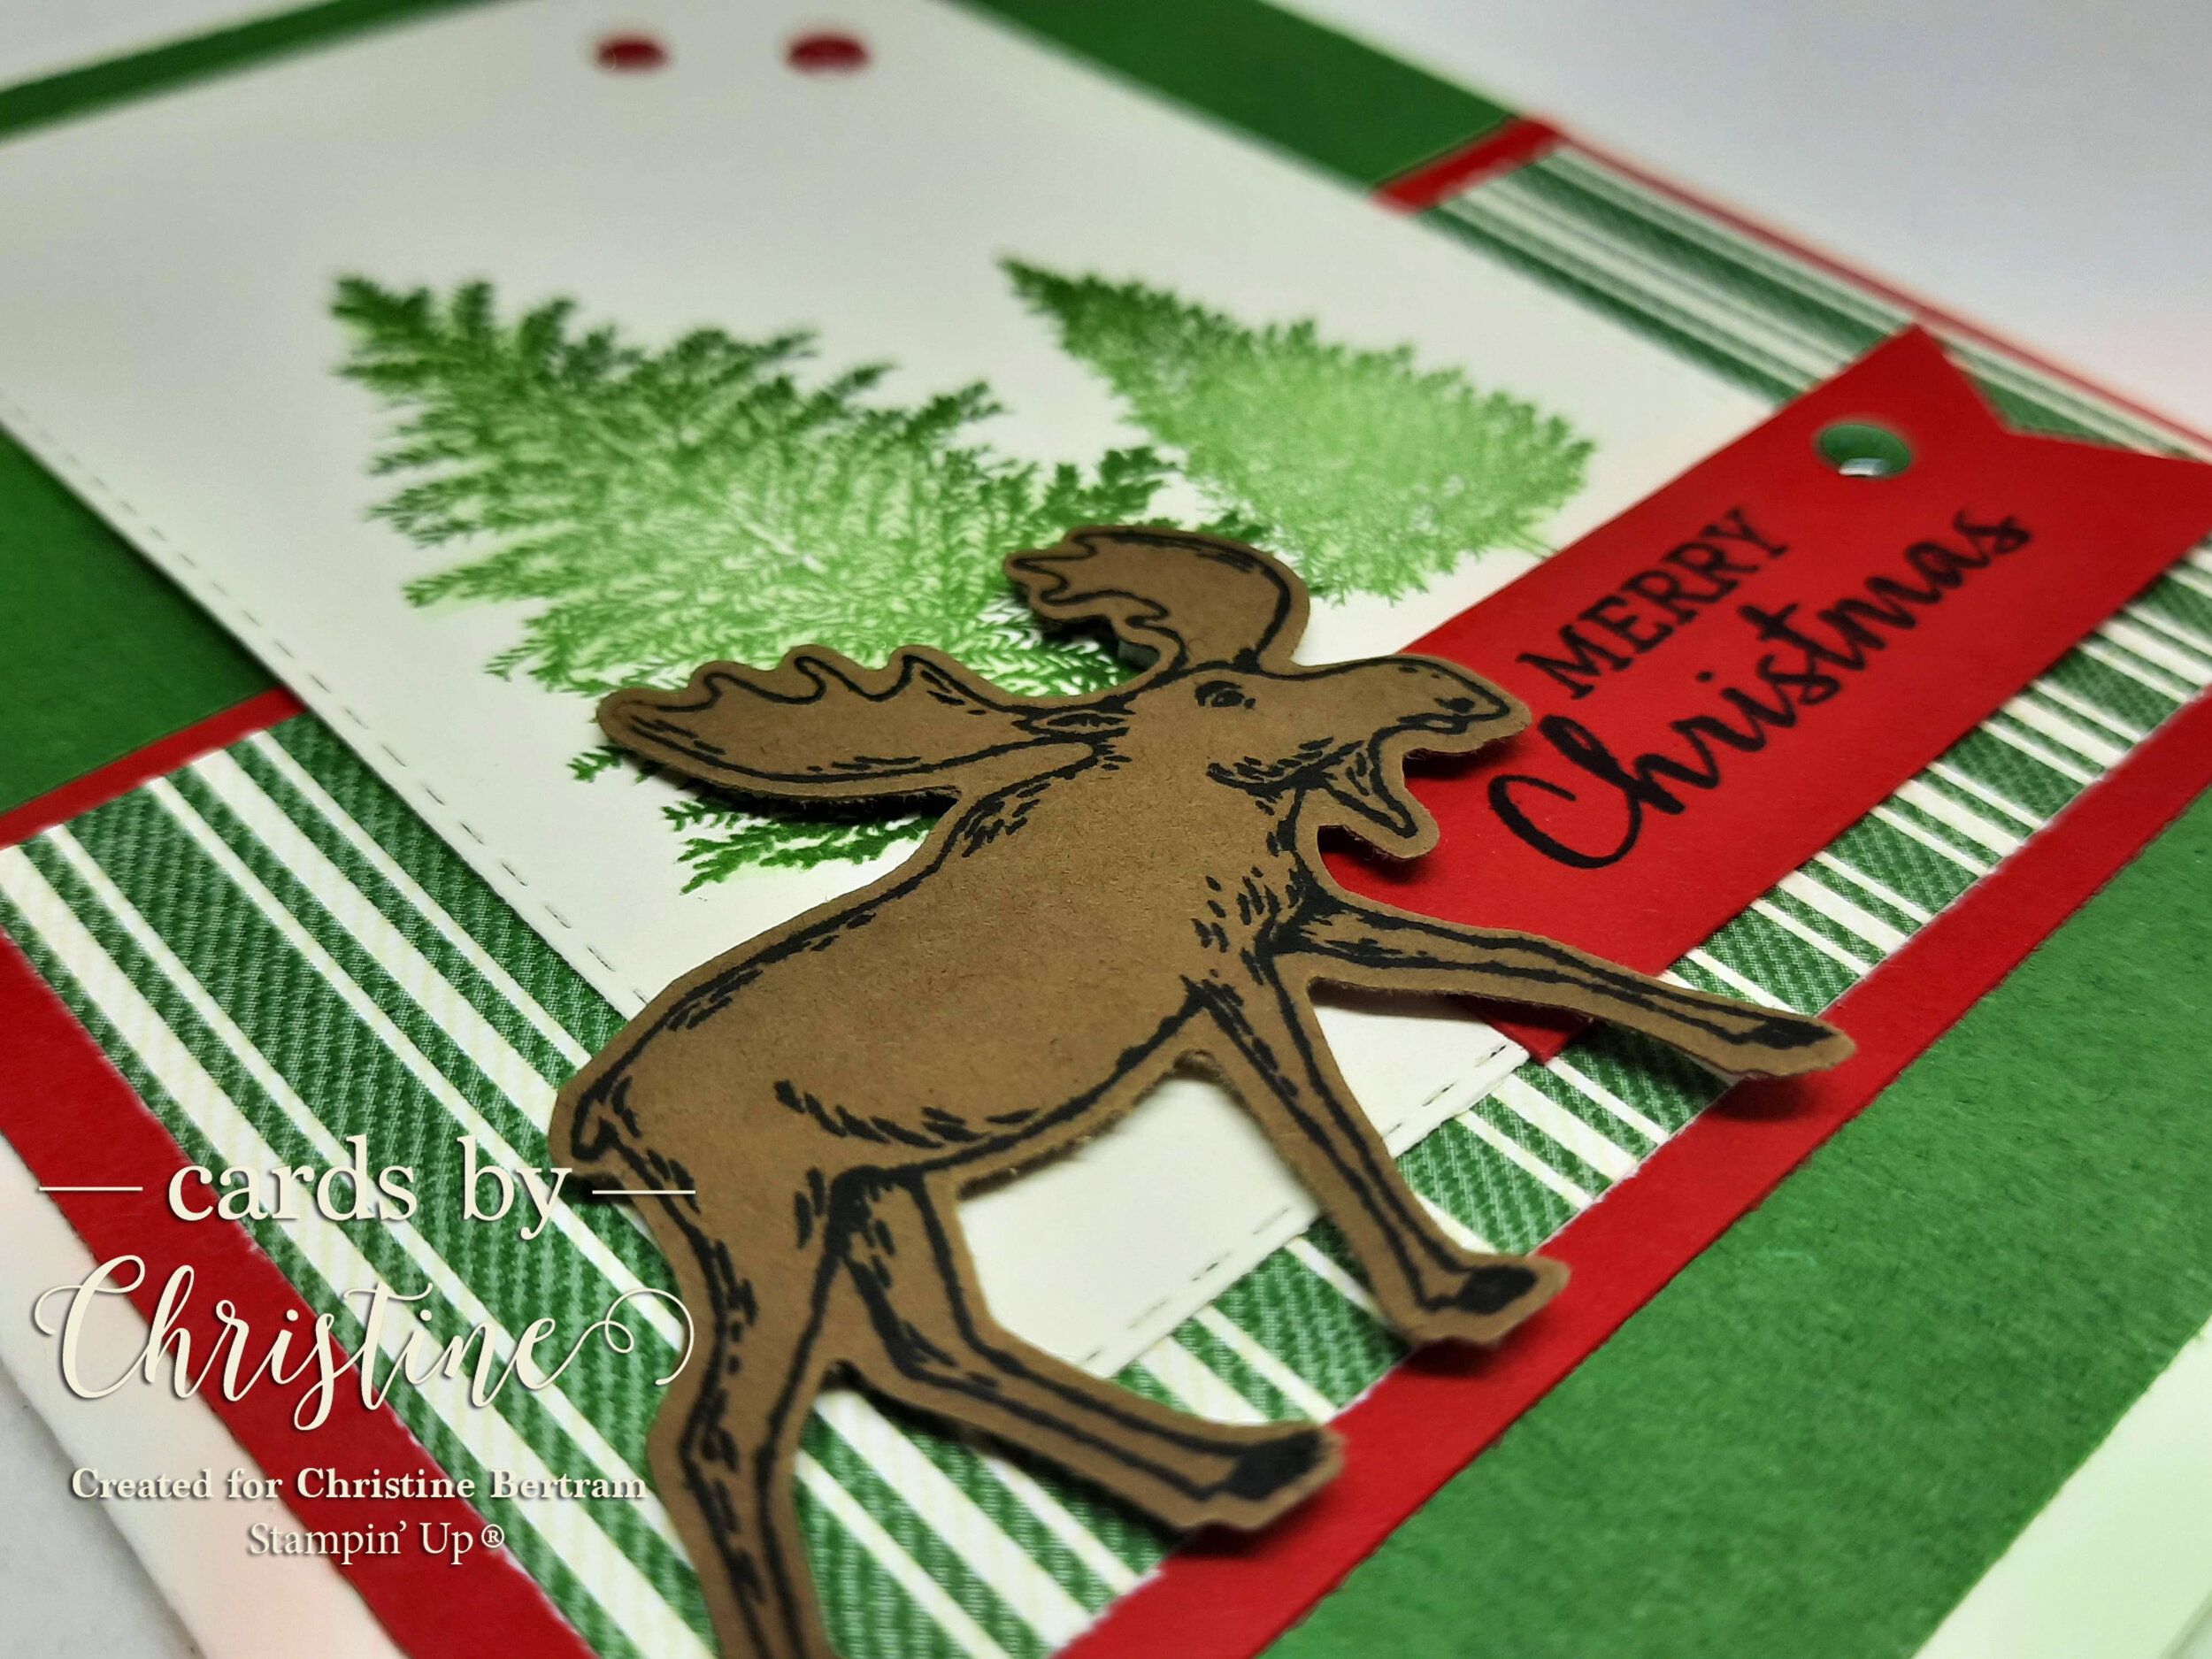
The holiday season is upon us and for most crafters we have been working on Christmas cards and projects for months already! I have started receiving cards in the mail for a couple of weeks now and every time I open a card (especially a handmade one) I am so honored that that person took the time and effort to think of me during this historically busy time. THAT is the impact that a handmade card has on the people on your mailing list! Anyways, on to the fun stuff! This card, designed by my team member, Diane, has traditional vibes but with a twist, your not-so-typically Christmas moose, ha ha! The greens, the reds, and of course those evergreen trees… whatever inspires you, use what’s left of your mojo to get those cards done and in the mail!

Merry Moose MM.jpg

Posted for You Bundle

The Posted for You Bundle is perfect for crafters of all levels and features imagery and sentiments for all kinds of occasions! Add in some coloring tools, and you can really make your projects unique and beautiful.

Product List

Make it Monday

20200831_144207.jpg

Can you believe December is nearly hear and Christmas is less than a month away!? Time to finish up those Christmas Cards, so use this beautiful card designed by my team member Tammy as inspiration to make beautiful things this holiday season. The bells in the Cherish the Season Bundle are classically elegant and a wonderful set to work with. I love the “nearly neutral” color scheme with the pop of Cherry Cobbler. And don’t forget to make those bells sparkle with none other than our best friend Stella! No matter what you make this holiday season, the recipient will know that you care and that is what holiday crafting is all about!

20200831_143505.jpg

Simple Stamping Tips

SW_11.25.PNG

To cut down on time, use one (or more) of the samples you see here for inspiration. We added depth and interest to these easy-to-assemble cards by stamping off, using stamped layers, and selecting a limited—but eye-catching—color palette. You can come up with other ideas by flipping through the catalog. Get out a notepad and write down all of the simple stamping ideas you see, then pick two or three to create a beautiful card!

Whatever you do, remember to post your creations on my Facebook Page, I can’t wait to see your projects!

Make it Monday - Thankful Gnomes!

I am so thankful for all of you and I hope you enjoy this community built around being creative and making beautiful things. 2020 has been a challenge for many, so this week is a great opportunity to reflect upon all of the great, positive things that are going on.

I cannot get over how cute this gnome card is! My teammate Cheryl designed this card and did a fantastic job creating a stunning fall garden scene using a great variety of stamps! There are so many cheery, happy things about this card, but I think my favorite is the adorable bow at the top of the gnomes hat with the cute little acorn trinket on it! I hope you enjoy the inspiration from this card :)

20200831_143449.jpg

CASEing Inspiration

SW_11.18.PNG

Feel like crafting, but you’re not sure what to make or where to start? Sometimes all it takes is a little inspiration. We recommend spending a few minutes looking through the catalog and searching for projects that remind you why you adore papercrafting! Before you know it, you’ll be pulling out your stamps, ink, and paper, ready to CASE (Copy and Share Everything).

  1. Copy the layout

  2. Copy the color scheme

  3. Copy the technique

As you may notice, our concept artist did just that with her samples. She CASEd the XOXO card then copied the layout, color combo, and technique to create her other three cards. See how easy? You may want to invite a friend over to CASE with you. Better yet, have a CASEing party! You never know what a big group of CASErs could come up with! And be sure to take pictures and post them in the Demonstrator Planning Place. We want to share in the fun!

Make it Monday - Christmas Cheer

20200831_144326.jpg

Have you begun making your holiday cards this year? Stampin’ Up! has so many great options to appeal to all tastes and skill levels. When I read this sentiment, I immediately saw visions from Christmas films. This beautiful card features traditional colors, and imagery from the “Christmas Means More” stamp set and of course stunning plaid from the Plaid Tidings DSP. I love the mixed typography in the sentiment and the bold silhouette imagery in this awesome card designed by my team member Melisa Madsen!

20200831_143337.jpg

Happy Christmas Step-by-Step

We’re all papercrafters, here. And that means visions of sugarplums (and Christmas crafting) start dancing in our heads as soon as October hits. Help those visions translate into reality by planning now to create handmade packaging for your family and friends—and help your customers do the same! Keep it simple or make it fancy. All that matters is that you add a bit of yourself to your giving this year by making it handmade and heartfelt.

CASUAL
The standout on this sweet Christmas packaging is our adorable, rustic tag. And trust us—once you make the first one, creating multiples is easy. Tip: Besides using the ripped paper technique, stamp off the solid trees to add depth. Once you finish stamping, tie the tag to the Mini Shipping Box with a bit of Linen Thread. So cute!

AVID
We fancied up our second tag by adding a variety of stamped embellishments. Just run the stamped images through the Stampin’ Cut & Emboss Machine with the Warm Wraps Dies, then adhere them with Stampin’ Dimensionals. We also added die-cut Real Red Cardstock trim along with open-weave ribbon and gold metallic trim from the Forever Greenery Trim Combo Pack for extra charm.

ARTFULLY AVID
We stepped up our final project by embossing the tag with the Wrapped in Texture Embossing Folder. We then adhered pretty wreath sprigs and finished with a bit of ink splattering using the Aqua Painter. This tag is so festive you could almost hang it on the Christmas tree!


Make it Monday - Christmas Elegance

20200831_143410.jpg

Christmas will be here before we know it, so get a jump on your Christmas cards! I love the elegance of this beautiful card designed by my team member, Lisa Piper. The rich Blackberry Bliss combined with silver heat embossing creates a bold card front. I especially love the branch in Mossy Meadow that the ornament is hanging from; don’t forget to stella it to really make it pop!

Snow Many Ways with Snowflakes

SW_11.4.20.PNG

Nature has many ways of showing off her genius, and one of the most notable examples is found in the delicate patterns of snowflakes. Our concept artist decided to highlight the whimsical beauty of these fabulous ice crystals using the So Many Snowflakes Dies (item 153560), a variety of embossing folders, and subtle, pastel color combinations to create truly breathtaking cards—which can be easily adapted to suit any winter occasion.

To make the watercolor snowflake accents featured on the Happy Hanukkah and Snowflake Wishes cards, we simply applied Blushing Bride and Misty Moonlight ink to the die-cut snowflakes using Sponge Daubers (item 133773)—replicating the soft hues of a wintry, twilight sky. Our artist enhanced the texture and beauty of these cards using the Winter Snow (item 153577) and Evergreen Forest 3D (item 153576) Embossing Folders, respectively.

To create our Thank You Snow Much gift bag, we embossed Brushed Metallic Cardstock (item 153524) using the Woodland Embossing Folder (item 152881) and added peek-through snowflake die-cut pieces for extra charm. Who wouldn’t love to receive this darling gift bag, tied with a 1-1/2" (3.8 cm) Metallic Mesh Ribbon (item 153550)?

How many ways can you showcase the beauty of snowflakes with your cards and 3D projects?

Make it Monday - Hey There!

MM_11.2.20.jpg

I love cards that have an unexpected element, like the front panel that is actually a flap that opens for an additional greeting or stamped image! The tones in this card are on point as we transition into the late days of fall. I love the vignette style sponging around the outside of the So Saffron paper as well as the beautiful subtle embossing folder to give it some extra texture. Make note of the use of the blends here for three different accents. The first is a scribble behind the sentiment to draw in some complimentary color, then the ribbon is colored with matching blends and lastly the rhinestone on the inside is also colored using the blends. Great use of our blends to draw in a lot of matching accessories! Thank you to my team member Michelle Heim for creating this beautiful card for me to share with you!

20200831_144001.jpg

SIMPLE STAMPING, THREE WAYS

SW_10.28.2020.PNG

Wishing you had lots of cards on hand for every occasion, but not sure where to start? Designing clean, simple projects is the quickest way to reach your goal.

If you want an even faster method for getting the job done—one that doesn’t involve coming up with your own card design—simply use one of the samples you see here as a basic template, substituting stamps, ink, and paper to suit your taste. When you follow the overall layout of the card, including image and sentiment placement, half of the work is done for you. At the end of your stamping session, you’ll have a stack of ready-to-send cards—finished in no time at all.

Easy techniques you can duplicate from our samples include, filling in the stamped images with Wink of Stella, creating fun backgrounds by stamping multiple images on a layer, and tone-on-tone stamping. To illustrate this final technique, we stamped the car image in Pool Party ink on Pool Party Cardstock to create a subtle background. (Tip: On the top layer, stamp the center tree first for even spacing.)Whatever you do to create your simple cards, have a great time! And invite a friend over to stamp with you. The more stampers, the more fun!

Make-it Monday - Magic in this Night

Photo_1603686296574.jpg

This Halloween card is so elegant and beautiful, it's hard to believe it was made to celebrate a “scary” holiday! The rich razzleberry and basic black accented with glitter and metallic make this card look so classy, and each of these elements add to the dimension and texture of this beauty. Special thanks to Angie, one of my Bee Happy Stampers for sharing this stunning design with us to get us in the mood for this upcoming holiday!

HAVE A HOOT STEP-BY-STEP

SW_Hoot.PNG

CASUAL
We kept things simple on the first version of this cute card. A few simple layers, a splash of color, ribbon, and a sentiment popped up using Stampin’ Dimensionals. This cheerful, little project takes just minutes to make and would be the perfect solution for a casual crafter.

AVID
Step up the charming second card by running the tag through the Stampin’ Cut & Emboss Machine using the Peek-A-Hoot Dies for a stitched-edge look. Fold the gold-trimmed satin ribbon in half, insert the ends through the hole in the tag, then pull them snugly through the loop at the end of the ribbon. We added a little extra pop to this card with a layer of Poinsettia Place Designer Series Paper, some Gold Glitter Enamel Dots, and heat embossing.

STEPPED-UP AVID
Our fanciest card is a real hoot. We embossed the card front using the Stampin’ Cut & Emboss Machine and the Evergreen Forest 3D Embossing Folder, adhered die-cut branches, and added a strip of Plush Poinsettia Specialty Paper. Perfect!

Whoo wouldn’t love to have a Christmas cardmaking party featuring these cute, outdoorsy cards? We certainly wood . . . er . . . would!

IN THE PINES BUNDLE

10.20_FLYER_HEADER_TEXT_MONTHLY_FOCUS_US.jpg

With forest-inspired imagery, the In the Pines Bundle helps you create easy projects with a woodsy, nature theme. While lending itself to Christmas projects, the In the Pines Stamp Set also includes a multi-occasion “Thinking of you” greeting. Use its timeless natural elements all year for masculine projects and more. The Two-Step Stampin’ images combined with the Pine Woods Dies make this bundle a must-have for creating quick cards any day of the year.

How to get the most out of your DSP #loveitchopit

Are you a paper collector? I can tell you with certainty that I am! I ooh and aah over how beautiful it is then never cut it out of its plastic wrap before I file it away for safe keeping. I think sometimes it is intimidating to cut up your paper because you don’t want to waste it, but not using it really is more of a waste than anything! The saying goes…. if you love your paper, you will chop your paper. If you do not cut up your paper, you do not truly love your paper! So let’s get together and make good use of that beautiful paper!

12x12 Paper

Using your 12x12 DSP to make card fronts allows you to quickly prep your paper to make a ton of quick and easy yet beautiful cards. If you cut your paper into two 5.25”x12” strips then rotate and cut into 4” pieces. You will be left with 6 5.25”x4” DSP mats that are the perfect size for a standard 5.5”x4.25” card base. If you chop up your whole pack of DSP, you will be ready to make 72 quick and easy cards by just adding some coordinating cardstock, ink and stamps!

6x6 Paper

Our 6x6 DSP can be intimidating and overwhelming, but crafting shouldn’t be either of these! My suggestion is to use your 6x6 paper for notecards (5”x3.5”). Take your paper and make two 1/2” inch cuts (leaving you with a piece of 6”x5” paper). Then rotate your paper to cut in half at 3”. Take your piece of 3”x5” paper and adhere it to your notecard then take a strip of coordinating DSP (from your first cuts) and adhere it next to it. You now have a notecard with edge-to-edge coverage that is ready to be embellished as you please! Pro Tip: notecards make a great gift! Pair 8 notecards and envelopes in a mini paper pumpkin box to make a great gift!


Make it Monday - Hello

20200831_144125.jpg

Did you catch last weeks “Technique Thursday” video about inking up embossing folders? This card made and designed by my team member Karla inspired that video to show off this simple, yet beautiful technique! In inking embossing folders, typically you’ll want to ink up the logo’d side (in this case where the background is raised up) with a stamp pad, being careful not to get too much ink into the trees. Once the embossing folder is inked, run it through your “Boss” (Stampin’ Cut and Emboss Machine) and you will end up with this beautifully colored and embossed image. This is a great way to get more mileage out of your embossing folders! This card is finished up by matting your embossed image with some Early Espresso then attaching it to a Whisper White card base and embellishing with a stamped sentiment on a tag, adding some adhesive snowflakes and some ribbon! So easy, yet so, so beautiful!

20200831_143545.jpg


CAPTURE MEMORIES WITH WONDER OF THE SEASON

Do you have shoeboxes filled with old Christmas photos that somehow never make it into a scrapbook? Let’s face it—when the celebration is all over, sometimes you just want to put your feet up and get comfy with a good book. You’ll put those Christmas photos in a scrapbook someday . . . right?

Or maybe you’d like to start planning now how you will preserve those merry 2020 Christmas memories. Either way, we’ve got you covered with the perfect memory preservation solution: the Wonder of the Season Memories & More Card Pack.

This gorgeous collection has 48 cards in two sizes, 12 specialty cards with gold foil, and eight sticker sheets. The double-sided cards are perfect for card fronts—or for scrapbooks. Simply tuck them into our Variety Pack 6" x 8" (15.2 x 20.3 cm) Photo Pocket Pages with your photographs—maybe add a little journaling—and your page is done. Scrapbooking does not get easier than that!

In our second sample, we show how you can use these beautifully designed cards to step up a traditional 12" x 12" (30.5 x 30.5 cm) scrapbook page. Arrange them artistically on the page with a favorite photo. If you prefer, get fancy with the addition of embossing and some banner shapes (as we did here). Even with a little extra stamping or a few embellishments—these gorgeous scrapbook pages are so easy to put together that you’ll still have time to get cozy with your book and rest after the Christmas fun subsides.

Make it Monday - Retiform Technique

9.28.20_MM.jpg

Fall is here and the crisp autumn air is setting in (here in Wisconsin). This card just gives me all the fall, outdoorsy vibes! Diane, a team member of mine, used the retiform technique to create this stunning, monochromatic card. To achieve this look, first plan out the layout of your card front then use a strip of scrap paper to partition off your card and sponge starting on the scrap and feathering your ink onto your card front (starting with more pressure to apply darker ink and easing up as you go to produce a lighter look). By doing this, you will create partitioned sections on your card that you can then stamp your focal images onto (using that same scrap as a mask to keep your image enclosed within its appropriate section. Some times you can make some really stunning things with not much more than stamps, ink, and paper!

Simple Stamping

Simple stamping is fun for everyone. Whether you’re brand new to papercrafting or you just want to stamp a greeting to add to a plate of cookies, we all need ideas for quick cards.

To make simple cards with a touch of pizzazz, use the “stamp-off” technique as we did here with the Love of Leaves Stamp Set. 1) Ink the stamp. 2) Stamp the image. 3) Re-stamp the image one or more times without re-inking it. This technique gives your card sophistication and depth without a lot of effort—and you get several shades of ink from one ink pad. Just add a bow and a sentiment and you’re done!

You can always add a touch of color to a card using a simple Blender Pen trick. (We used the wheelbarrow image from the Autumn Goodness Stamp Set.) Stamp the image, then go over the stamped lines with the Blender Pen to color in the wheelbarrow. So fun! Plus, you’ve added a touch of artistry that doesn’t require a lot of effort.

We used the stunningly beautiful Autumn Greetings Stamp Set to create our final example—and to show you how stamped cardstock layers can add visual complexity without requiring a ton of work. Stamp one layer with a large stamp and adhere it to the card front. Then add a stamped tag—popped up with a Stampin’ Dimensional. It looks sophisticated, yet it’s easy to do. Simple stamping at its finest!